

Alright, my flavor adventurers! Get ready for a dessert that doesn’t just sparkle, it sings with joy and bold, satisfying deliciousness. I’m talking about the legendary Christmas Lights Cookies, a recipe that lights up any room, literally!
The first time I served these Christmas Lights Cookies, the reaction was pure magic. My niece, who usually just picks at desserts, grabbed one, her eyes wide. She took a bite, paused, and then declared, “Auntie Quinn, these are like happiness you can eat!” That moment told me everything. This wasn’t just a cookie; it was a flavor bomb of festive joy, pure edible Christmas decorations.
That’s the Cuba Queen philosophy, right? We don’t do boring. We do celebration-worthy, every single time. And these Christmas Lights Cookies hit that sweet spot like a flavor explosion on a snowy night. They’re vibrant, fun, and absolutely addictive.
My heart swells watching people’s faces light up when they see these sugar cookie light bulbs. The intricate royal icing cookies recipe delivers on both taste and visual impact. It’s a testament to simple ingredients coming together for something truly spectacular.
I knew these Christmas Lights Cookies had to be a staple in my holiday baking arsenal. They embody the festive spirit, bringing that Cuba Queen zest to traditional holiday treats. This recipe is designed to make your kitchen feel like a culinary playground.
The beauty of these Christmas Lights Cookies lies in their simplicity yet stunning presentation. They are an easy Christmas baking project with a huge wow factor. It’s about bringing that confident, unapologetic excitement to every bite.
These Christmas Lights Cookies are more than just a sweet treat; they’re a conversation starter, a centerpiece, and a reminder that bold flavors make every day feel like a party. I’ve perfected this recipe over countless taste-testing sessions, ensuring every cookie is a masterpiece. Get ready to bake some unforgettable memories.
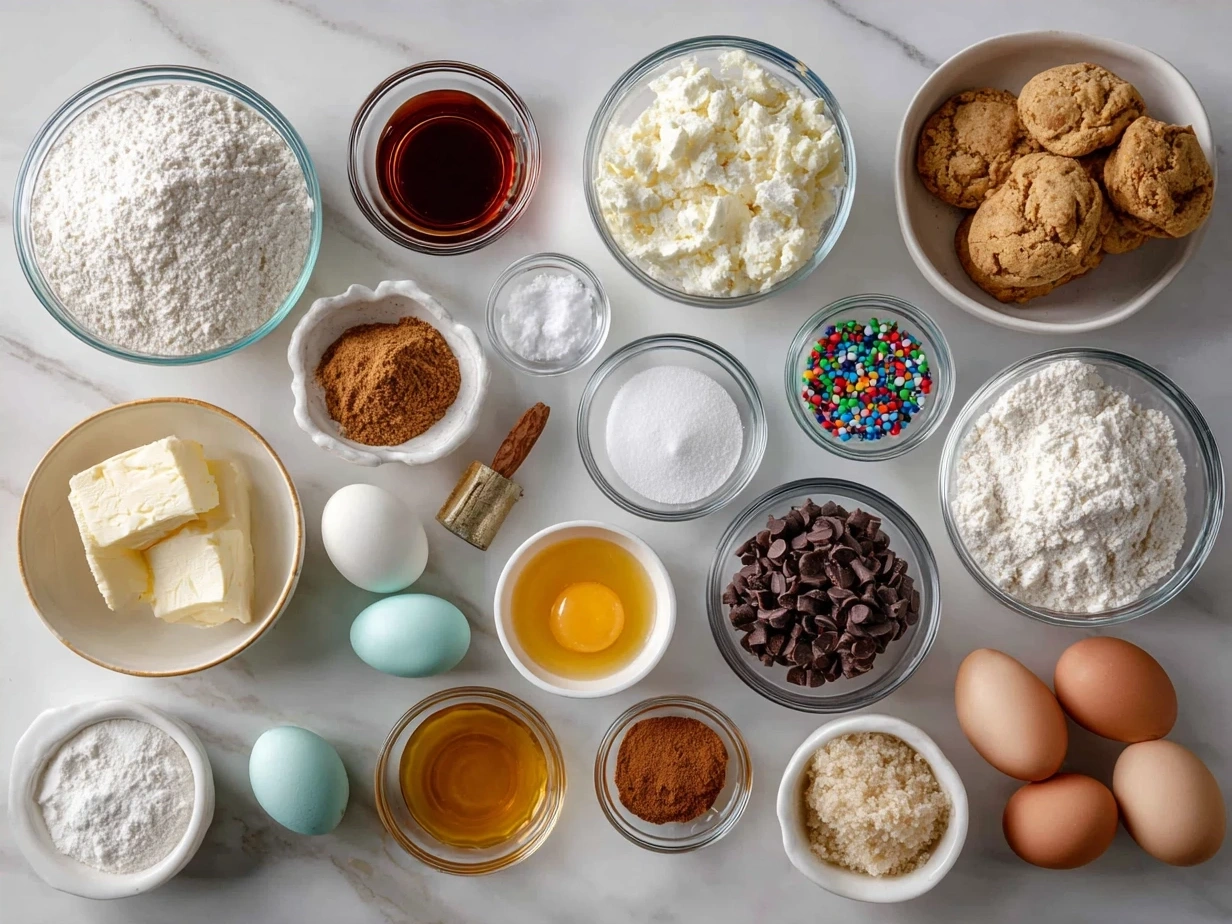
INGREDIENTS You Need for This: Christmas Lights Cookies
This Christmas Lights Cookies ingredient list is SHORT but mighty, my friends! We’re focusing on quality here, because a few stellar components create an epic flavor bomb. You want your festive holiday cookies to truly shine.
For the Sugar Cookies:
- 3 cups All-purpose flour: This is the foundation. Don’t skimp on a good quality brand for the best texture in your Christmas Lights Cookies.
- 1 teaspoon Baking powder: Just a touch to give them that perfect, slightly soft chew.
- 1/2 teaspoon Salt: Balances the sweetness beautifully.
- 1 cup (2 sticks) Unsalted butter, softened: The secret to epic Christmas Lights Cookies is using unsalted butter. It allows you to control the salt content precisely.
- 1 cup Granulated sugar: Provides the perfect amount of sweetness.
- 1 Large egg: Binds everything together, giving your sugar cookie light bulbs structure.
- 1 teaspoon Vanilla extract: Splurge on this one Christmas Lights Cookies ingredient – trust me. A high-quality vanilla makes all the difference in the final flavor profile. Pure vanilla extract, always!
For the Royal Icing:
- 4 cups Powdered sugar, sifted: Sifting is non-negotiable for smooth, pipeable royal icing cookies recipe.
- 3 tablespoons Meringue powder: This is the Christmas Lights Cookies game-changer that will blow your mind. It stabilizes the icing and gives it that beautiful, hard finish. You’ll find the best ingredients for this Christmas Lights Cookies at any specialty baking store or online.
- 1/2 teaspoon Vanilla extract: Again, quality vanilla for that subtle, delightful aroma.
- 5-6 tablespoons Water, room temperature: Add this gradually to achieve the right consistency for outlining and flooding.
- Gel food coloring (red, green, blue, yellow, orange, white): Gel colors give you vibrant, concentrated hues without thinning your icing too much. For budget-friendly alternatives that still deliver bold colors, look for reputable brands in your local grocery store’s baking aisle.
For the “Filaments” & Decoration:
- Mini chocolate chips or sprinkles: These will be the tiny filaments in your edible Christmas decorations.
- Black edible marker (optional): For outlining the “base” of your light bulbs.
To store your softened butter for these Christmas Lights Cookies, you can leave it on the counter for an hour or two before baking. This ensures it creams perfectly with the sugar. For the meringue powder, keep it in a cool, dry place – it lasts ages!
STEP-BY-STEP INSTRUCTIONS: Crafting Your Epic Christmas Lights Cookies
Alright, my flavor adventurers, this is where the magic happens! Don’t stress – your Christmas Lights Cookies are going to be incredible. We’re breaking down this royal icing cookies recipe into easy, powerful steps.
1. Prep the Cookie Dough – The Foundation of Festive Holiday Cookies:
In a large bowl, whisk together your 3 cups of flour, 1 teaspoon of baking powder, and 1/2 teaspoon of salt. Set that aside. This ensures all your dry ingredients are evenly distributed, leading to uniform sugar cookie light bulbs.
2. Cream That Butter and Sugar:
In a separate, even larger bowl, using an electric mixer, cream together your 1 cup (2 sticks) of softened unsalted butter and 1 cup of granulated sugar. Beat it until it’s light and fluffy, about 2-3 minutes. This aerates the mixture, giving your Christmas Lights Cookies a tender crumb.
3. Add the Wet Ingredients:
Beat in the large egg and 1 teaspoon of vanilla extract until just combined. Don’t overmix here! Overmixing can make your Christmas Lights Cookies tough. This mixture is transforming into pure magic.
4. Combine Wet and Dry:
Gradually add the dry ingredient mixture to the wet ingredients, mixing on low speed until just combined. The dough will be soft. This is where most people mess up their Christmas Lights Cookies – mixing too much. Stop when no streaks of flour remain.
5. Chill Out, Dough!
Divide your dough in half, flatten each half into a disk, and wrap tightly in plastic wrap. Refrigerate for at least 1 hour, or up to 2 days. This chilling time is a pro tip for Christmas Lights Cookies perfection; it prevents spreading and makes the dough easier to handle.
6. Roll and Cut Your Sugar Cookie Light Bulbs:
Preheat your oven to 375°F (190°C). Line baking sheets with parchment paper. On a lightly floured surface, roll one disk of chilled dough to about 1/4-inch thickness. Use a light bulb-shaped cookie cutter (you can find these easily online or in craft stores during the holidays) to cut out your edible Christmas decorations. For more fun shapes, consider using cookie cutters similar to these Simple Sugar Cookie Recipe with Mini M&M’s for the Holiday Season.
7. Bake to Perfection:
Carefully transfer the cut-out Christmas Lights Cookies to your prepared baking sheets. Bake for 8-10 minutes, or until the edges are lightly golden. In my kitchen, this Christmas Lights Cookies batch takes exactly 9 minutes for that ideal chewiness.
8. Cool Down:
Let the Christmas Lights Cookies cool on the baking sheets for 5 minutes before transferring them to a wire rack to cool completely. Cooling completely is crucial before you even think about icing!
9. Make That Royal Icing:
While your Christmas Lights Cookies are working their magic and cooling, it’s icing time! In a large bowl, combine 4 cups of sifted powdered sugar and 3 tablespoons of meringue powder. Slowly add 1/2 teaspoon of vanilla extract and 5-6 tablespoons of water, mixing on low speed until everything comes together. Beat on medium-high speed for 5-7 minutes until the icing is thick, glossy, and holds stiff peaks. You want a consistency that slowly melts back into itself after 10-15 seconds when you drop a spoonful back into the bowl. This is the sweet spot for a royal icing cookies recipe. For a slightly different royal icing approach, check out this guide on Christmas Lights Cookies with Royal Icing | Dessert for Two.
10. Color Your World:
Divide the white royal icing into separate bowls – one for each color (red, green, blue, yellow, orange, and a bit of white for the base). Add a few drops of gel food coloring to each, mixing until you achieve vibrant hues. Transfer each color to a piping bag fitted with a small round tip (like a PME #1 or Wilton #2). You can also use squeeze bottles for easier flooding.
11. Outline and Flood Your Christmas Lights Cookies:
Using a black edible marker, draw a small rectangle at the bottom of each cookie – this is your “bulb base.” Outline each light bulb shape with a thick border of colored icing. Then, thin some of the colored icing with a few drops of water until it’s “flood” consistency (it should spread smoothly). Fill in the outlined area with this thinned icing. Use a toothpick to gently spread the icing to the edges and pop any air bubbles. Allow each color to dry for at least 1-2 hours, or overnight, before adding any further details. This creates perfectly smooth edible Christmas decorations.
12. Add the Filaments:
Once the colored icing is completely dry, use a bit of white icing to pipe a tiny dot or swirl in the center of the colored “bulb.” Immediately place a mini chocolate chip or a few sprinkles on top to create the filament effect. For inspiration on gifting these, look at this SUGAR COOKIE CHRISTMAS GIFT….including a Christmas Lights ….
13. Final Touches and Drying:
Allow your finished Christmas Lights Cookies to dry completely on a wire rack for several hours, or even overnight. This ensures the icing sets hard, protecting your beautiful edible Christmas decorations. Your easy Christmas baking project is almost complete!
PRESENTATION: Making Your Christmas Lights Cookies Shine
People absolutely lose their minds when I serve these Christmas Lights Cookies at holiday gatherings. These aren’t just cookies; they’re an experience, a flavor adventure for the eyes and the taste buds. We’re going for maximum impact here!
Arrange your Christmas Lights Cookies on a large, rustic wooden platter or a vibrant, colorful tray. Scatter some fresh cranberries or sprigs of rosemary around them for a pop of natural greenery. This creates an Instagram-worthy plating technique that screams festive holiday cookies. The contrast of the bright cookies against natural elements is stunning.
For bold pairing suggestions, serve these sugar cookie light bulbs with a warm mug of Cuban coffee, robust and strong, cutting through the sweetness perfectly. Or, offer a creamy Coquito – Puerto Rico’s famous coconut eggnog – for an extra layer of tropical holiday indulgence. The richness of the Coquito complements the crisp sweetness of the royal icing cookies recipe beautifully.
These Christmas Lights Cookies absolutely slay at dinner parties, cookie exchanges, and especially as a thoughtful, homemade gift. Imagine a beautiful tin filled with these edible Christmas decorations – it’s a gift from the heart that truly delivers on flavor and charm. They are perfect for family gatherings or even a cozy night in, adding a touch of bold celebration.
Got leftovers? Ha! That rarely happens with my Christmas Lights Cookies, but if by some miracle you do, these keep well in an airtight container at room temperature for up to a week. You can also freeze them (once the icing is fully set) for a month, then just thaw and enjoy that flavor bomb all over again.
For seasonal Christmas Lights Cookies variations, I’ve played with different glitters for an extra sparkle, or added a hint of almond extract to the cookie dough for a subtle twist. I even made a batch with a touch of orange zest in the cookie for a citrusy kick. If you love that citrus twist, you have to try my Christmas Cookies with Orange Juice or my incredible Christmas Cranberry Orange Cookies. For another fun holiday treat, don’t miss these delightful Christmas Pinwheel Cookies. They’re next-level!
FAQs: Your Christmas Lights Cookies Questions Answered!
Got questions about these epic Christmas Lights Cookies? I’ve got you covered, flavor adventurer! My testing experiences have shown me all the ins and outs, so let’s get these royal icing cookies recipe questions handled.
1. Can I make the cookie dough ahead of time for my Christmas Lights Cookies?
Absolutely, yes! This is a power move for easy Christmas baking. You can make the dough and keep it tightly wrapped in the refrigerator for up to 2 days. This makes the whole process so much smoother. I often prep the dough a day early.
2. What if I don’t have a light bulb cookie cutter for my Christmas Lights Cookies?
No problem! Get creative. You can use a simple oval or even a small round cutter and then use the black edible marker to draw the “base” of the bulb. It’s about the spirit of the Christmas Lights Cookies, not rigid perfection! You can also find great inspiration for different cookie shapes with this Simple Sugar Cookie Recipe with Mini M&M’s for the Holiday Season.
3. How do I know when my royal icing is perfectly done for these festive holiday cookies?
You want a thick, glossy icing that holds stiff peaks, but when you drop a spoonful back into the bowl, the peak should slowly melt back into itself after about 10-15 seconds. If it’s too thick, add water a few drops at a time. Too thin? Add more sifted powdered sugar. Practice makes perfect with this royal icing cookies recipe.
4. My royal icing is clumpy or won’t pipe smoothly for my edible Christmas decorations. What went wrong?
Did you sift your powdered sugar? That’s usually the culprit! Lumps in powdered sugar will clog your piping tips. Also, ensure your meringue powder is fresh. For guidance on getting that perfect royal icing, check out more tips at Christmas Lights Cookies with Royal Icing | Dessert for Two.
5. Can I customize the flavors of my Christmas Lights Cookies?
Heck yes! That’s what Cuba Queen is all about! Try adding a teaspoon of almond extract to the cookie dough instead of vanilla, or a hint of lemon zest. For the icing, a tiny drop of peppermint extract could be a fun, festive twist. These sugar cookie light bulbs are your canvas.
6. How long do these Christmas Lights Cookies last, and how should I store them?
Once the icing is completely dry and set (this can take several hours, even overnight), store them in an airtight container at room temperature for up to a week. Layer them with parchment paper to prevent sticking. They are surprisingly robust edible Christmas decorations.
7. Can I freeze decorated Christmas Lights Cookies?
Yes, you absolutely can! Once the royal icing is completely dry and hardened, carefully layer the cookies in an airtight freezer-safe container, separated by parchment paper. They will keep beautifully for up to a month. Thaw them at room temperature. This is an excellent tip for advanced holiday prep for your easy Christmas baking.
8. My cookies spread too much. What did I do wrong with my Christmas Lights Cookies dough?
This usually means your butter was too soft, or you didn’t chill the dough long enough. Always ensure your butter is softened but not melted. And don’t skip that crucial chilling step for your Christmas Lights Cookies. It’s a non-negotiable for perfectly shaped sugar cookie light bulbs.
9. Are these Christmas Lights Cookies good for a cookie exchange?
Are you kidding me? They’re an absolute showstopper! Community feedback consistently says these Christmas Lights Cookies are the first to disappear. They’re vibrant, unique, and taste incredible. Get ready for compliments and requests for the royal icing cookies recipe.
CONCLUSION: Light Up Your Kitchen with Christmas Lights Cookies!
These Christmas Lights Cookies represent everything Cuba Queen stands for: bold flavors, vibrant presentation, and making every moment a celebration. This isn’t just a cookie; it’s a declaration that your kitchen is a place of joy, creativity, and unapologetically delicious food. You, my flavor adventurer, are capable of creating absolute magic!
My Christmas Lights Cookies Power Tips:
- Chill Your Dough Like a Boss: Don’t skip the refrigeration step for the cookie dough. It’s the secret weapon for perfectly shaped Christmas Lights Cookies that hold their form.
- Sift Your Powdered Sugar: This is non-negotiable for silky-smooth royal icing that pipes flawlessly on your Christmas Lights Cookies. No lumps, no clogs, just pure icing magic.
- Dry Completely: Give your iced Christmas Lights Cookies ample time to dry. Patience here prevents smudges and ensures your edible Christmas decorations are picture-perfect.
I’ve created and loved so many Christmas Lights Cookies variations. One year, I added a tiny hint of cardamom to the cookie dough – unexpectedly delicious! Another batch had a touch of orange zest, brightening the whole flavor profile. But the version that always gets the biggest reactions? It’s when I incorporate subtle glitter dust into the wet icing for an extra twinkle. Those Christmas Lights Cookies really sparkle!

I encourage you to make these Christmas Lights Cookies your signature dish this holiday season. You have the power to create these stunning, flavor-packed treats. I have full confidence in your cooking success.
Now go forth, create, and light up your holiday with these incredible Christmas Lights Cookies! Share your results with me – I can’t wait to see your flavor adventures!
\n \n Print
Christmas Lights Cookies

Brighten your holiday season with these adorable Christmas Lights Cookies! Made from a classic sugar cookie base and decorated with vibrant icing, they’re a fun and festive treat perfect for sharing.
- Prep Time: 40 minutes
- Cook Time: 10 minutes
- Total Time: 2 hours 30 minutes
- Yield: 3 dozen cookies
- Category: Dessert
- Method: Baked
- Cuisine: American
Ingredients
- 1 ½ cups (3 sticks) unsalted butter, softened
- 2 cups granulated sugar
- 4 large eggs
- 1 teaspoon vanilla extract
- 5 cups all-purpose flour
- 2 teaspoons baking powder
- 1 teaspoon salt
- For the Icing:
- 4 cups powdered sugar
- ¼ cup milk (or water)
- 1 teaspoon vanilla extract
- Food coloring (black, red, green, blue, yellow, etc.)
- For Decoration:
- Mini M&M’s or other colorful small round candies
- Black edible marker or black icing in a fine tip
Instructions
- In a large bowl, cream together the softened butter and granulated sugar until light and fluffy.
- Beat in the eggs one at a time, then stir in the vanilla extract.
- In a separate bowl, whisk together the flour, baking powder, and salt. Gradually add the dry ingredients to the wet ingredients, mixing until just combined and a soft dough forms. Do not overmix.
- Divide the dough into two disks, wrap in plastic wrap, and refrigerate for at least 1 hour (or up to 2 days).
- Preheat oven to 375°F (190°C). Line baking sheets with parchment paper.
- On a lightly floured surface, roll out one disk of dough to about ¼-inch thickness. Use a small, narrow rectangle cookie cutter (or cut strips and trim) to create the “light bulb” shape, or simply cut out circles and pinch one end to make a bulb shape.
- Place cookies on prepared baking sheets, leaving about 1 inch between them.
- Bake for 8-10 minutes, or until the edges are lightly golden. Let cool on the baking sheets for a few minutes before transferring to a wire rack to cool completely.
- Prepare the icing: In a medium bowl, whisk together powdered sugar, milk, and vanilla extract until smooth. Adjust consistency with more milk (for thinner) or powdered sugar (for thicker) as needed.
- Divide the icing into several small bowls. Add different food colorings to each bowl to create your desired “light bulb” colors (red, green, blue, yellow, orange). Keep a small amount of black icing for the “wire.”
- Once cookies are completely cool, frost each cookie with a colored icing, leaving a small, un-iced section at the bottom for the “base” of the light bulb. Let the icing set for at least 30 minutes.
- Use the black edible marker or black icing to draw a squiggly “wire” connecting the light bulbs on the cookies. You can draw individual wires or one long wire across multiple cookies.
- If desired, you can use the black icing to create a small “filament” detail at the base of each colored bulb.
- Let the cookies set completely before storing in an airtight container.
Notes
For an extra touch, use a small star cookie cutter to make a “star” cookie, decorate it with yellow icing, and place it at one end of your cookie “string” to resemble the top of a Christmas tree.