

Okay, amiga! Get ready to ditch those basic Halloween treats because I’m about to drop a flavor bomb on you! We’re diving headfirst into the decadent world of Halloween No-Bake Icebox Cake. Forget slaving away in a hot kitchen – this is pure, unadulterated flavor that comes together in minutes.
This isn’t your grandma’s icebox cake. I’m talking layers of chocolatey goodness, spooky surprises, and a taste that will have everyone screaming… for more! As Cuba Queen, I’m all about bold flavors and easy wins, and this Halloween No-Bake Icebox Cake delivers on both fronts. This recipe is my love letter to all things chocolate and spooky. Get ready to transform your kitchen into a culinary playground and create a Halloween No-Bake Icebox Cake that everyone will remember.
INGREDIENTS You Need for This:

- 1 (14.3 ounce) package Oreo cookies: The classic for a reason! They provide the perfect chocolate base for our cake. You can find these anywhere, but I like to get mine in bulk at Costco, for those serious Halloween No-Bake Icebox Cake parties.
- 1 (8 ounce) package cream cheese, softened: This is the binder that holds our creamy layers together. Don’t even think about using low-fat! Full-fat cream cheese is the key to richness and texture.
- 1 (14 ounce) can sweetened condensed milk: This adds sweetness and creates a dreamy, creamy texture. Trust me, this is a MUST for the Halloween No-Bake Icebox Cake.
- 1 teaspoon vanilla extract: Adds depth and enhances the other flavors.
- 1 (8 ounce) container whipped topping, thawed: This is where we get that light, airy texture. Cool Whip is my go-to, but feel free to use your favorite brand.
- 1/2 cup milk: To soften those cookies and make them melt in your mouth!
- Halloween sprinkles and candies: Go wild! This is where you get to unleash your inner spooky artist.
- Optional: Gummy worms, candy eyeballs, chocolate shavings: For extra spooky flair!
This Halloween No-Bake Icebox Cake ingredient list is SHORT but mighty! The secret to epic Halloween No-Bake Icebox Cake is using full-fat cream cheese instead of low-fat. It makes all the difference in the texture and flavor. You’ll find the best Halloween sprinkles and candies at your local craft store or online. Splurge on high-quality chocolate shavings for this one Halloween No-Bake Icebox Cake ingredient – trust me, it’s worth it! If you’re on a budget, you can use chocolate chips instead of shavings, but the taste isn’t quite the same. Store the cream cheese at room temperature for at least an hour before starting to make your life easier.
STEP-BY-STEP INSTRUCTIONS:
- First, grab a 9×13 inch baking dish. Trust me, this is where the magic happens.
- In a medium bowl, crush about half of the Oreo cookies. You can use a food processor or a Ziploc bag and a rolling pin. I like to use the rolling pin – it’s more therapeutic!
- In a large bowl, beat the softened cream cheese with an electric mixer until smooth and creamy. Don’t stress – your Halloween No-Bake Icebox Cake is going to be incredible.
- Add the sweetened condensed milk and vanilla extract to the cream cheese mixture and beat until well combined. This is where your Halloween No-Bake Icebox Cake base begins to shine.
- Gently fold in the thawed whipped topping. Be careful not to overmix – you want to keep it light and airy. Your Halloween No-Bake Icebox Cake should look like a fluffy cloud of deliciousness.
- Dip the remaining whole Oreo cookies in milk for just a second or two – you don’t want them to get soggy! Pro tip for Halloween No-Bake Icebox Cake perfection: Don’t oversoak the cookies, unless you want them to dissolve.
- Arrange a layer of milk-soaked Oreo cookies on the bottom of the baking dish. This forms the base of our cake.
- Spread half of the cream cheese mixture over the Oreo cookie layer. This is where the flavors start to meld.
- Sprinkle the crushed Oreo cookies over the cream cheese layer. The more, the merrier!
- Repeat layers, starting with the milk-soaked Oreo cookies, then the remaining cream cheese mixture, and ending with another layer of crushed Oreos. This is where your Halloween No-Bake Icebox Cake transforms into pure magic!
- Decorate the top with Halloween sprinkles, candies, gummy worms, and candy eyeballs. Get creative!
- Cover the dish with plastic wrap and refrigerate for at least 4 hours, or preferably overnight. This allows the flavors to fully develop and the cookies to soften. In my kitchen, this Halloween No-Bake Icebox Cake takes exactly 6 hours to reach peak perfection.
Here’s where most people mess up their Halloween No-Bake Icebox Cake – but not you! Make sure your cream cheese is truly softened. Otherwise, you’ll end up with a lumpy mixture. The most important tip is to be patient. This Halloween No-Bake Icebox Cake gets better as it chills! While your Halloween No-Bake Icebox Cake is working its magic, grab your camera – this is Instagram gold!
PRESENTATION:
This Halloween No-Bake Icebox Cake is all about the spooky factor! Pile on those Halloween sprinkles, gummy worms, and candy eyeballs. Get the kids involved and let them decorate it. It is all about having fun!
People absolutely lose their minds when I serve this Halloween No-Bake Icebox Cake at Halloween parties. I’ve even seen adults fight over the last slice! The best way to serve it is chilled, straight from the fridge. Cut it into squares and arrange them on a platter. Add a scoop of vanilla ice cream on the side for extra decadence. This Halloween No-Bake Icebox Cake absolutely slays at potlucks!
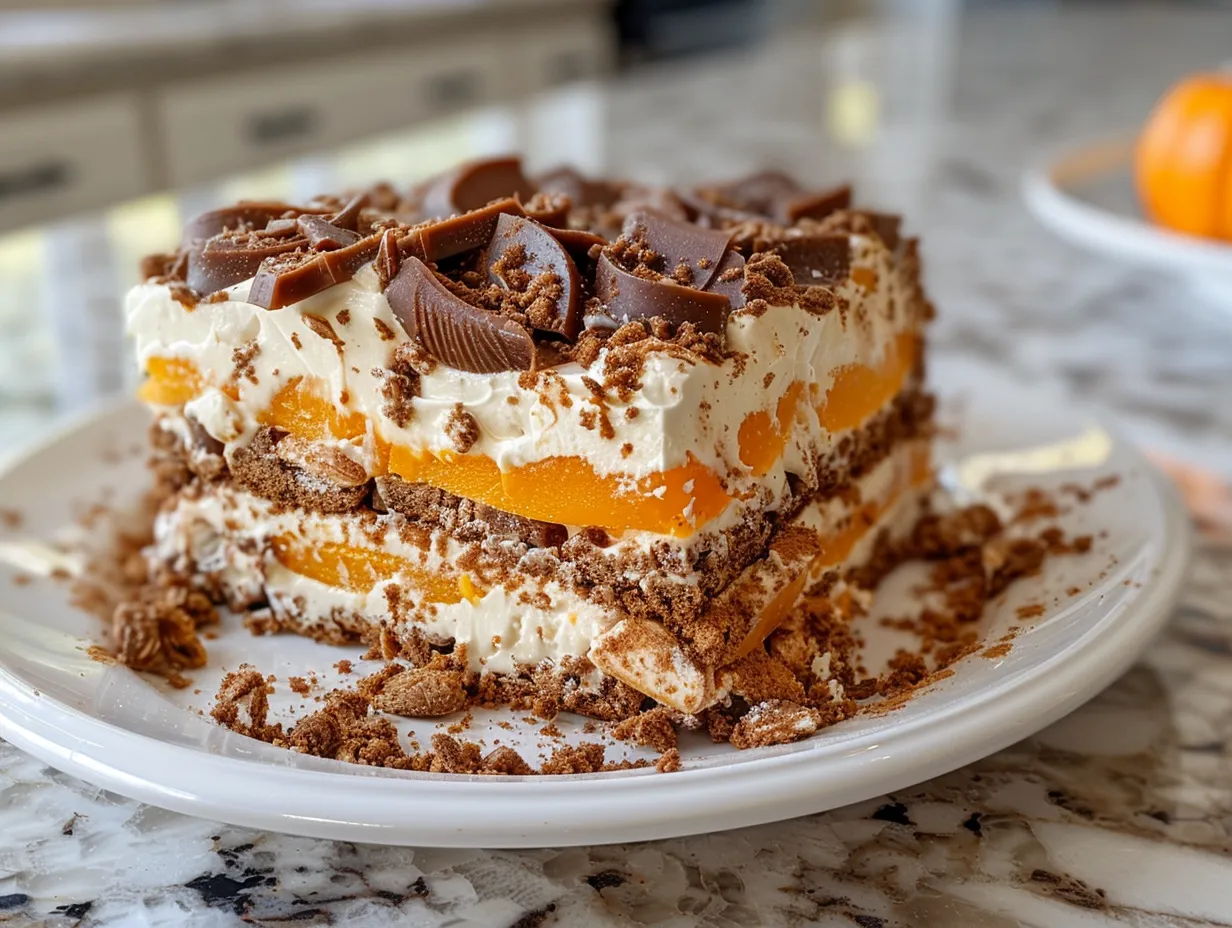
For leftover transformations, crumble the cake and mix it with vanilla ice cream for a spooky Halloween milkshake. Or, layer it in parfait glasses with chocolate pudding and whipped cream for individual desserts. I have been thinking about making this in the fall. A seasonal Halloween No-Bake Icebox Cake variation is to use pumpkin spice Oreos and add a layer of pumpkin puree to the cream cheese mixture.
This Halloween No-Bake Icebox Cake reminds me of another flavor explosion: my Mini Banana Pudding Cheesecakes. You should definitely check that out if you love this!
FAQs:
- Can I make this Halloween No-Bake Icebox Cake ahead of time? Absolutely! In fact, it’s better if you do. The cake needs at least 4 hours to chill, but it can be made up to 2 days in advance.
- What if I don’t have sweetened condensed milk? Unfortunately, there’s no good substitute for sweetened condensed milk in this recipe. It provides a unique sweetness and creamy texture that you can’t replicate with other ingredients.
- Can I use a different type of cookie? Of course! Chocolate chip cookies, graham crackers, or even gingersnaps would work well. Just make sure they’re crisp enough to hold their shape when soaked in milk. My community has suggested some spooky variations, like using chocolate cookies with orange filling!
- Can I make this Halloween No-Bake Icebox Cake spicier? Amiga, you know I love spice! Add a pinch of cayenne pepper to the cream cheese mixture for a subtle kick. Or, use chocolate cookies with chili powder.
- How do I know when my Halloween No-Bake Icebox Cake is perfectly done? The cookies should be soft and the cream cheese mixture should be firm. If the cookies are still crunchy, it needs more time in the fridge.
- What if my cream cheese mixture is lumpy? Make sure your cream cheese is fully softened before you start mixing. If it’s still lumpy, try beating it with an electric mixer for a few minutes until it’s smooth.
- Can I freeze this Halloween No-Bake Icebox Cake? I don’t recommend freezing it, as the texture of the cream cheese mixture may change. It’s best enjoyed fresh. You are not alone if you are thinking about new ways to make this!
CONCLUSION:
This Halloween No-Bake Icebox Cake is more than just a dessert – it’s a celebration of bold flavors, easy techniques, and spooky fun! It represents everything Cuba Queen stands for: unapologetic deliciousness that anyone can create. I’m confident that you will nail this recipe and amaze your friends and family.
My Halloween No-Bake Icebox Cake Power Tips:
- Don’t oversoak the cookies! A quick dip is all you need.
- Use full-fat cream cheese! It makes all the difference.
- Chill for at least 4 hours! Patience is key.
I’ve created a few Halloween No-Bake Icebox Cake variations that I absolutely love: a peanut butter cup version, a cookies and cream version with white chocolate shavings, and a spooky s’mores version with toasted marshmallows. I’ve seen the biggest reactions to the peanut butter cup one!
Make this Halloween No-Bake Icebox Cake your signature dish and watch everyone’s faces light up. I have complete confidence in your cooking skills. You got this, flavor adventurer! Get ready to create some unforgettable Halloween No-Bake Icebox Cake memories! Don’t forget to share your spooky creations with me – I can’t wait to see them! For more bold flavor adventures, check out my Raspberry White Chocolate Cake Roll. It’s a guaranteed crowd-pleaser!
This Halloween, step up your dessert game. You don’t need to stress, try this Halloween Icebox Cake – Lemon Blossoms for inspiration. Or maybe, try this No Bake Halloween Dirt Cake – Liv’s Little Muffins for something unique. For a savory dish, check out my Butternut Squash Pancakes. These will be a flavor explosion for your taste buds! If you would like another option for a great Halloween Icebox Cake Recipe | Kardea Brown | Food Network be sure to click the link!
Halloween No-Bake Icebox Cake

This Halloween No-Bake Icebox Cake is a simple and spooky dessert perfect for parties. Layers of chocolate wafers and creamy pudding create a delicious treat with minimal effort.
- Prep Time: 15 minutes
- Cook Time: 0 minutes
- Total Time: 15 minutes
- Yield: 12 servings
- Category: Dessert
- Method: No-Cook
- Cuisine: American
Ingredients
- 1 (16 ounce) package chocolate wafer cookies
- 2 (3.4 ounce) packages instant chocolate pudding mix
- 3 cups milk
- 1 (8 ounce) container frozen whipped topping, thawed
- Halloween sprinkles, for decoration
- Candy eyeballs, for decoration
Instructions
- In a medium bowl, whisk together the chocolate pudding mix and milk until smooth. Let stand for 5 minutes to thicken.
- Gently fold in the thawed whipped topping until well combined.
- Line the bottom of a 9×13 inch baking dish with a single layer of chocolate wafer cookies.
- Spread a layer of pudding mixture over the cookies.
- Repeat layers of cookies and pudding until all ingredients are used, ending with a layer of pudding.
- Cover the dish with plastic wrap and refrigerate for at least 4 hours, or preferably overnight, to allow the cookies to soften.
- Before serving, decorate the cake with Halloween sprinkles and candy eyeballs.
- Slice and serve chilled.
Notes
For a richer flavor, use whole milk instead of reduced-fat milk. You can also add a layer of crushed Oreo cookies for extra texture.