

Okay, flavor adventurers, buckle up because I’m about to share my obsession: the ultimate Homemade Cake Pop Recipe! I’m talking about the kind of treat that makes everyone’s eyes light up, the kind that turns a regular Tuesday into a full-blown fiesta. Forget those bland, store-bought pops—we’re diving headfirst into a world of homemade deliciousness!
I’ve been tinkering with this Homemade Cake Pop Recipe for what feels like forever. Seriously, countless batches. My kitchen looked like a sprinkles explosion happened. But trust me, all that delicious chaos was worth it.
The game-changer? Using the right kind of frosting and cake combo. Too dry, and you’ve got sad, crumbly pops. Too wet, and they’re a sticky mess. After many tweaks, I nailed the perfect ratio. So, prepare to be amazed!
This Homemade Cake Pop Recipe isn’t just a recipe; it’s a statement. It’s about ditching the boring and embracing flavor with every single bite. It’s Cuba Queen to the core: bold, fun, and guaranteed to make you the star of any party. Get ready to unleash your inner cake pop artist!
INGREDIENTS You Need for This:
- 1 box (15.25 ounces) cake mix (any flavor): I’m partial to vanilla or chocolate, but feel free to get wild! Experiment!
- Ingredients called for on the cake mix box (usually oil, eggs, and water).
- 1/2 cup frosting (any flavor): Here’s the Homemade Cake Pop Recipe secret: Go for a rich, creamy frosting that complements your cake. Cream cheese frosting with vanilla cake? YES. Chocolate frosting with chocolate cake? Double YES!
- Candy Melts or Chocolate for coating: About 12-16 ounces. Milk chocolate, dark chocolate, white chocolate – whatever your heart desires! You can even mix colors!
- Sprinkles, chopped nuts, or other toppings: Because more is more, flavor adventurers!
- Cake pop sticks: Usually 4-inch or 6-inch. You can find these at most craft stores or online.
- Vegetable shortening: A tablespoon or two to thin the candy melts.
- Optional: Gel food coloring: For tinting the candy melts.

The secret to an epic Homemade Cake Pop Recipe is using high-quality chocolate for the coating. Splurge a little! You’ll thank me later.
You’ll find the best cake pop sticks at your local craft store. Get the sturdy ones – you don’t want your masterpiece falling apart.
For a budget-friendly alternative to candy melts, you can use chocolate chips mixed with a little bit of coconut oil. It works like a charm!
STEP-BY-STEP INSTRUCTIONS:
- Bake the Cake: Bake the cake according to the directions on the box. Let it cool completely. I know, patience is tough, but trust me on this. A warm cake will crumble into a mess.
- Crumble Time: Once the cake is cool, crumble it into a large bowl. Use your hands! It’s strangely therapeutic. Make sure there are no large chunks.
- Frosting Power: Add the frosting to the crumbled cake. Start with 1/2 cup and mix well with your hands or a spatula until the mixture is moist and holds together. Don’t overmix! You want it to be just combined. This is where the magic of the Homemade Cake Pop Recipe begins!
- Roll ‘Em: Roll the cake mixture into 1-inch balls. Place them on a baking sheet lined with parchment paper. Pro tip for Homemade Cake Pop Recipe perfection: use a cookie scoop to ensure all the cake pops are the same size.
- Chill Out: Place the baking sheet in the freezer for about 15-20 minutes. This helps the cake pops firm up and prevents them from falling apart when you dip them.
- Melt the Chocolate: While the cake pops are chilling, melt the candy melts or chocolate in a double boiler or microwave. If microwaving, do it in 30-second intervals, stirring in between to prevent burning. Add a tablespoon of vegetable shortening to thin the chocolate and make it easier to dip. Remember, smooth chocolate is key for a perfect Homemade Cake Pop Recipe.
- Dip Time: Remove the cake pops from the freezer. Dip the tip of a cake pop stick into the melted chocolate and insert it halfway into a cake ball. This helps secure the cake pop to the stick. Dip each cake pop into the melted chocolate, swirling to coat completely. Gently tap off any excess chocolate. The Homemade Cake Pop Recipe success depends on this.
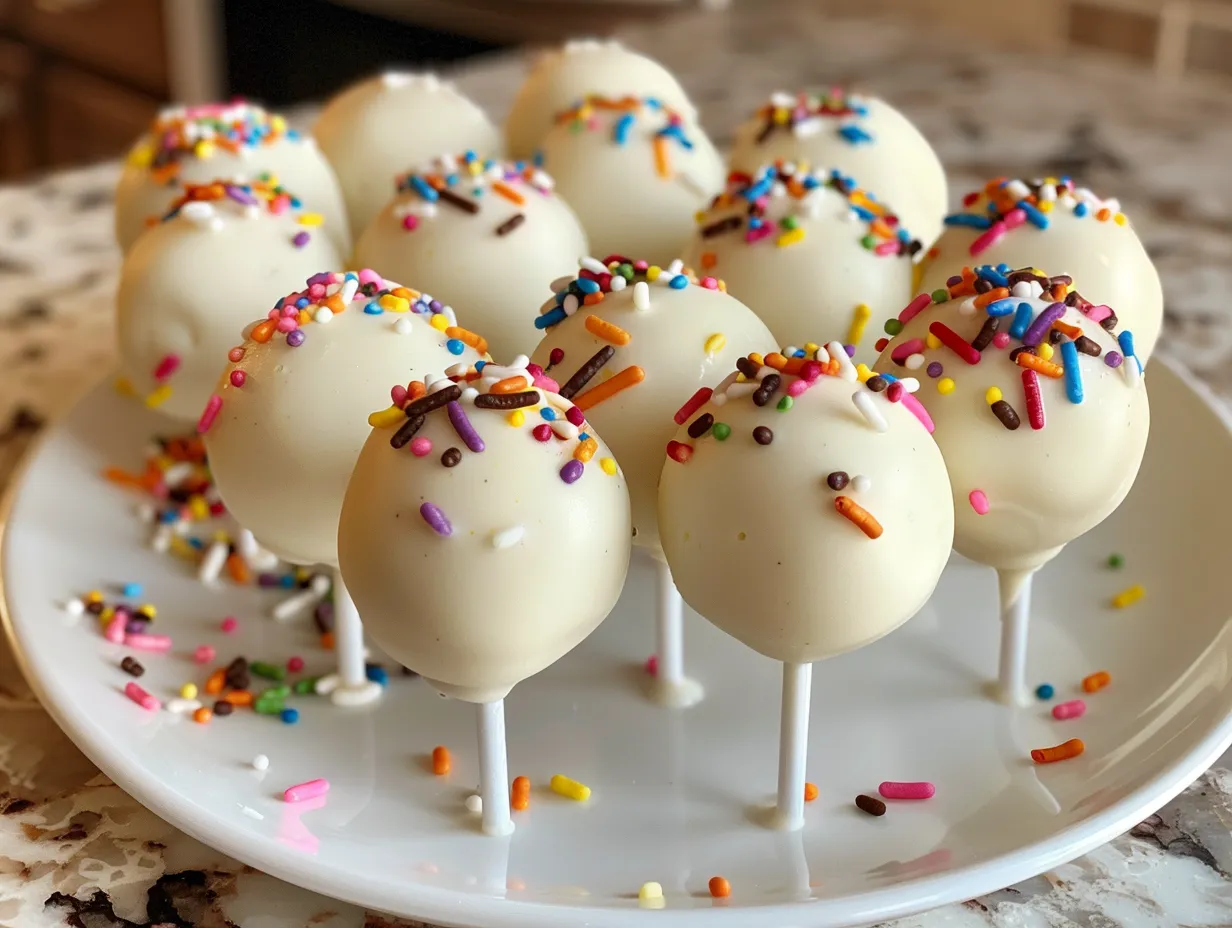
- Sprinkle Magic: Immediately decorate with sprinkles, chopped nuts, or other toppings before the chocolate sets. Place the decorated cake pops in a cake pop stand or stick them into a Styrofoam block to dry.
- Chill Again: Place the cake pops in the refrigerator for about 10-15 minutes to allow the chocolate to harden completely. In my kitchen, this Homemade Cake Pop Recipe takes exactly that long!
Here’s where most people mess up their Homemade Cake Pop Recipe – they rush the chilling process!
While your Homemade Cake Pop Recipe is working its magic, grab your camera – this is Instagram gold! ✨
PRESENTATION:
Presentation is everything, flavor adventurers! These aren’t just cake pops; they’re mini masterpieces.
For maximum impact, arrange your Homemade Cake Pop Recipe creations on a tiered cake stand. It adds instant elegance and makes them look irresistible.
Bold pairing suggestions: Serve these with a scoop of vanilla ice cream or a glass of chilled sparkling wine. The contrast of temperatures and textures is heavenly.
These are perfect for birthday parties, baby showers, or even just a fun weekend treat. People absolutely lose their minds when I serve this Homemade Cake Pop Recipe at parties!
For Instagram-worthy plating, try drizzling a contrasting color of melted chocolate over the finished cake pops. It adds a touch of artistry and visual appeal.
Creative leftover transformations: If you somehow have leftover cake pops (doubtful!), crumble them over ice cream or use them as a garnish for cupcakes.
Seasonal Homemade Cake Pop Recipe variations I’ve tested: For fall, try pumpkin spice cake with white chocolate and cinnamon sprinkles. For Christmas, go for peppermint bark cake pops with crushed candy canes.
This Homemade Cake Pop Recipe absolutely slays at dinner parties! It’s a conversation starter. Everyone raves about it.
FAQs:
Q: Can I make this Homemade Cake Pop Recipe spicier?
A: Abso-freakin-lutely! Add a pinch of cayenne pepper to the cake batter or a dash of chili powder to the chocolate coating. Just be careful not to overdo it!
Q: What if I don’t have cake pop sticks for my Homemade Cake Pop Recipe?
A: No problem! You can use lollipop sticks or even sturdy straws in a pinch.
Q: How do I know when my Homemade Cake Pop Recipe is perfectly done?
A: The chocolate coating should be smooth, shiny, and completely hardened. If it’s still sticky, pop them back in the fridge for a few more minutes.
Q: Can I use different types of chocolate for this Homemade Cake Pop Recipe?
A: Of course! Milk chocolate, dark chocolate, white chocolate, even flavored chocolate – the sky’s the limit! Experiment and find your favorite combination.
Q: My cake pops keep falling off the sticks! What am I doing wrong with my Homemade Cake Pop Recipe?
A: Make sure the cake balls are firm and chilled before dipping. Also, ensure that the chocolate is not too hot or too thin. Dipping the stick in chocolate before inserting it into the cake ball also helps.
Q: Can I make this Homemade Cake Pop Recipe ahead of time?
A: Yes! You can store the finished cake pops in an airtight container in the refrigerator for up to a week.
Q: What’s the best way to melt the chocolate for this Homemade Cake Pop Recipe?
A: I prefer using a double boiler because it gives you more control over the temperature and prevents the chocolate from burning. But if you’re short on time, the microwave works just fine. Just be sure to use short intervals and stir frequently.
For a fantastic tutorial, check out Easy Cake Pops – Cakes by MK!
CONCLUSION:
This Homemade Cake Pop Recipe represents everything Cuba Queen stands for: bold flavor, creative expression, and a whole lot of fun!
Here are my Homemade Cake Pop Recipe Power Tips:
- Chill, Chill, Chill: Seriously, chilling the cake balls before dipping is crucial. It prevents them from crumbling and falling apart.
- Thin the Chocolate: Adding a little vegetable shortening to the melted chocolate makes it easier to dip and creates a smoother coating.
- Don’t Be Afraid to Experiment: Try different cake flavors, frostings, and toppings. The possibilities are endless!
Here are a few Homemade Cake Pop Recipe variations I’ve created and loved:
- Red Velvet Cake Pops with Cream Cheese Frosting and White Chocolate: A classic combination that never disappoints.
- Lemon Cake Pops with Lemon Cream Cheese Frosting and White Chocolate: For a tangy and refreshing treat.
- Cookies and Cream Cake Pops with Oreo Crumbs and White Chocolate: A crowd-pleasing favorite.
The Cookies and Cream Homemade Cake Pop Recipe version gets the biggest reactions. People go absolutely wild for it!
I have full confidence that you’re going to nail this Homemade Cake Pop Recipe! It’s all about having fun and letting your creativity shine.
Now go forth, flavor adventurers, and create some Homemade Cake Pop Recipe memories! I can’t wait to see your creations! Share your results and tag me!
For additional information, explore these recipes: Homemade Cake Pops – Sally’s Baking or Cake Pop Recipe (Easy!) – Cookies For Days – Cookies for Days!
If this recipe rocks your world, you NEED to try my Mini Banana Pudding Cheesecakes or Raspberry White Chocolate Cake Roll! This Homemade Cake Pop Recipe reminds me of another flavor explosion: my Butternut Squash Pancakes! Get ready to take your taste buds on an adventure!
Homemade Cake Pop Recipe
These homemade cake pops are moist, delicious, and perfect for parties! They’re surprisingly easy to make with just a few simple ingredients.
- Prep Time: 30 minutes
- Cook Time: 25 minutes
- Total Time: 55 minutes
- Yield: 24 cake pops
- Category: Dessert
- Method: Baked
- Cuisine: American
Ingredients
- 1 box cake mix (any flavor), baked according to package directions
- 1 can (16 oz) frosting, matching cake flavor
- 12 oz candy melts (any color)
- Lollipop sticks
- Sprinkles or other decorations (optional)
Instructions
- Bake cake according to package directions. Let cool completely.
- Crumble the cooled cake into a large bowl.
- Add frosting to the crumbled cake and mix until well combined and a dough-like consistency forms.
- Roll the cake mixture into 1-inch balls. Place on a parchment-lined baking sheet.
- Melt candy melts according to package directions.
- Dip the tip of a lollipop stick into the melted candy and insert it into a cake ball. Repeat with remaining cake balls.
- Dip each cake pop into the melted candy, coating completely. Tap off any excess candy.
- Immediately decorate with sprinkles or other decorations, if desired.
- Place the cake pops in a stand or back on the parchment paper until the candy coating is set. You can refrigerate to speed up the process.
Notes
For easier dipping, melt the candy melts in a tall, narrow glass. You can also add a tablespoon of shortening to the candy melts to make them smoother and easier to work with.