
Okay, Get Ready to Bake!
Okay, flavor adventurers! Get ready to bow down to my latest obsession: the ultimate homemade cheese Danish recipe! Seriously, this isn’t your grandma’s bland breakfast pastry. This homemade cheese Danish recipe is a flavor bomb just waiting to explode in your mouth. I’m talking flaky, buttery layers embracing a creamy, tangy filling that’s so good, it’s almost sinful.
I went through so many trials to perfect this homemade cheese Danish recipe! There were tears (okay, maybe just a little frustration), and a whole lot of taste-testing. The breakthrough came when I decided to ditch the overly sweet, artificial flavors and let the quality ingredients shine. This homemade cheese Danish recipe is not for the faint of heart. We’re packing serious flavor here, friends.
This homemade cheese Danish recipe is the perfect balance of sweet and tangy. It’s the kind of treat that makes you close your eyes and savor every single bite. It’s proof that you don’t need a fancy bakery to create something truly special. I’m beyond stoked to share this homemade cheese Danish recipe with you. So grab your aprons, and let’s get baking!
INGREDIENTS You Need
This homemade cheese Danish recipe ingredient list is SHORT but mighty! Don’t let the simplicity fool you – each component plays a crucial role in achieving that perfect balance of flaky crust and creamy filling.

- 1 sheet (14.1 oz) of Puff Pastry, thawed: Trust me, using all-butter puff pastry is worth the splurge for this homemade cheese Danish recipe. It’s the key to achieving that light, flaky texture.
- 8 oz Cream Cheese, softened: Full-fat cream cheese is non-negotiable! It provides the richness and tanginess that makes the cheese danish filling so irresistible.
- 1/4 cup Granulated Sugar: Just enough sweetness to balance the tang of the cream cheese in this homemade cheese Danish recipe.
- 1 Large Egg Yolk: The secret to a silky smooth cheese danish filling that melts in your mouth.
- 1 teaspoon Vanilla Extract: A touch of vanilla enhances all the other flavors and adds a warm, comforting note to this homemade cheese Danish recipe.
- 1/4 teaspoon Almond Extract: This is the game-changer! A little almond extract adds a subtle, nutty complexity that elevates the entire cheese danish filling. Don’t skip it.
- 1 tablespoon Milk: For brushing the puff pastry, creating a beautiful golden-brown crust in this homemade cheese Danish recipe.
- Turbinado Sugar (optional): A sprinkle of coarse sugar adds a delightful crunch and sparkle to the finished danishes.
You’ll find the best ingredients for this homemade cheese Danish recipe at your local grocery store, but don’t be afraid to explore specialty shops for high-quality puff pastry. Seriously, the quality of your ingredients will make all the difference in this homemade cheese Danish recipe!
STEP-BY-STEP INSTRUCTIONS
Okay, flavor adventurers, let’s get down to business! This is where the magic happens. Don’t stress – your homemade cheese Danish recipe is going to be incredible. I promise!
- Preheat your oven to 400°F (200°C). While the oven is preheating, line a baking sheet with parchment paper. This will prevent your homemade cheese Danish recipe from sticking and make cleanup a breeze.
- In a medium bowl, beat together the softened cream cheese, granulated sugar, egg yolk, vanilla extract, and almond extract until smooth and creamy. This is the heart of your cheese danish filling, so make sure everything is well combined. No one wants lumps in their homemade cheese Danish recipe variations!
- Gently unfold the thawed puff pastry sheet on a lightly floured surface. Pro tip for homemade cheese Danish recipe perfection: Don’t overwork the dough! You want to keep those delicate layers intact for maximum flakiness.
- Cut the puff pastry sheet into 9 equal squares. A pizza cutter works wonders here! Just make sure you’re using a sharp knife so that the puff pastry is neatly cut for this homemade cheese Danish recipe.
- Place a spoonful of the cream cheese mixture in the center of each square. Don’t overfill! You want enough filling to create a delicious bite, but not so much that it spills out during baking of this homemade cheese Danish recipe.
- Fold two opposite corners of each square towards the center, pinching them together to secure the filling. This creates a classic pinwheel shape for this easy cheese danish recipe. Get creative with your folds! You can also fold all four corners towards the center for a different look.
- Brush the tops of the danishes with milk and sprinkle with turbinado sugar (if using). The milk wash helps the puff pastry brown beautifully, and the turbinado sugar adds a delightful crunch to this homemade cheese Danish recipe.
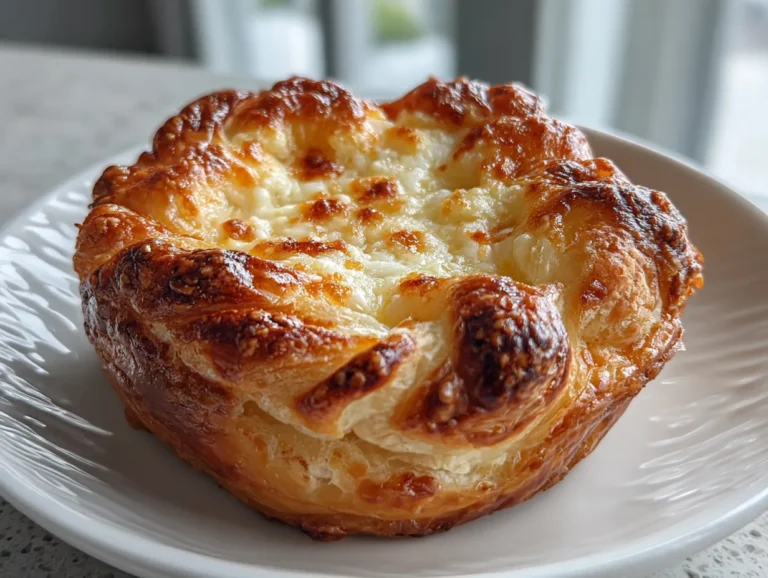
- Bake for 15-20 minutes, or until the puff pastry is golden brown and the filling is set. Your homemade cheese Danish recipe should look golden brown and puffed up. The aroma will be intoxicating! Keep a close eye on them during the last few minutes of baking to prevent burning.
- Let the danishes cool slightly on the baking sheet before transferring them to a wire rack to cool completely. Patience is key! Letting them cool slightly will prevent the filling from oozing out.
- Enjoy! While your homemade cheese Danish recipe is working its magic, grab your camera – this is Instagram gold! Share your creation and tag me!
Here’s where most people mess up their homemade cheese Danish recipe – they rush the process. Take your time, follow the steps carefully, and trust your instincts. You got this!
PRESENTATION
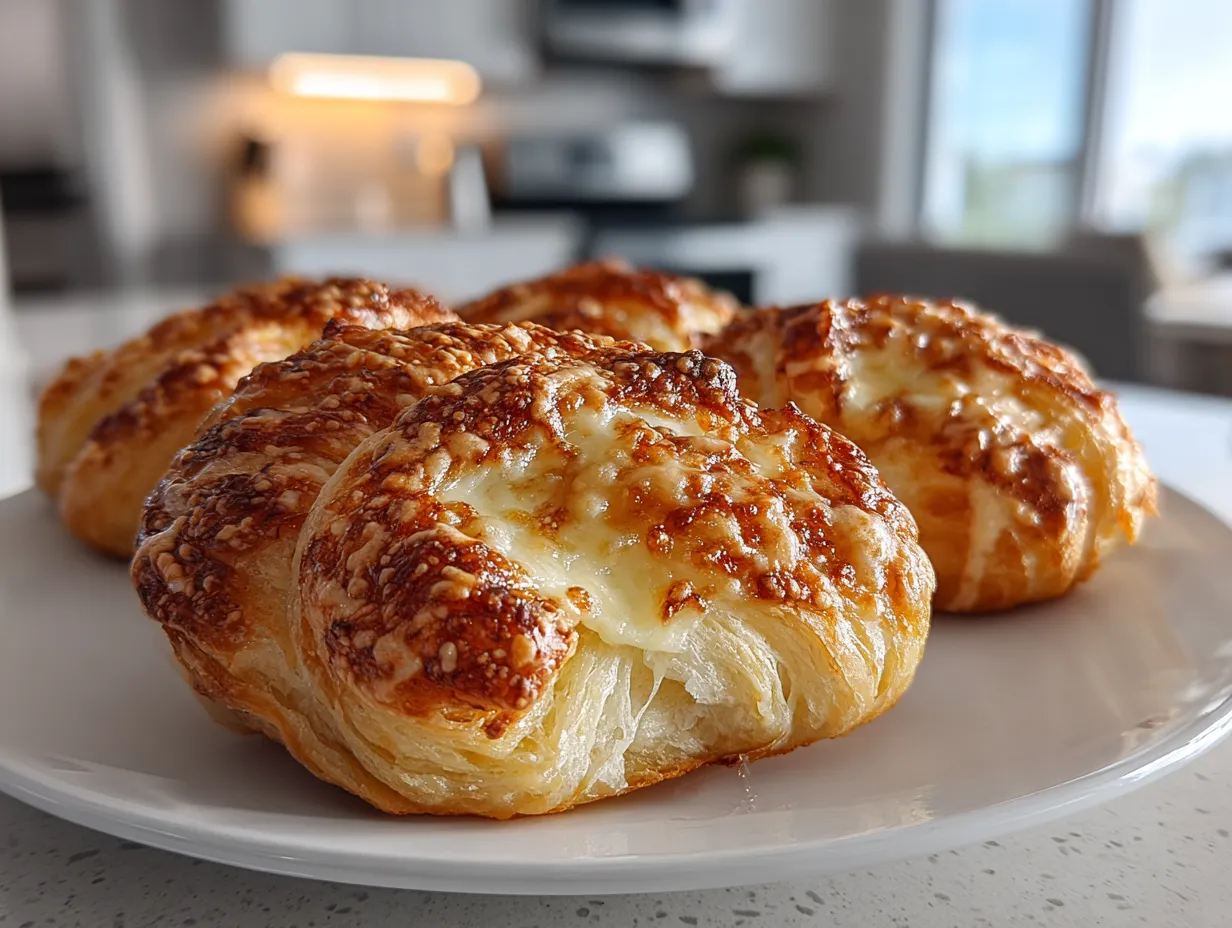
Presentation is everything, flavor adventurers! Don’t just slap those danishes on a plate. Let’s create a moment! This homemade cheese Danish recipe deserves a grand entrance.
People absolutely lose their minds when I serve this homemade cheese Danish recipe at brunch. Arrange the warm danishes on a platter lined with a linen napkin. Dust with powdered sugar for an extra touch of elegance. Serve alongside fresh berries, like raspberries and blueberries. The bright colors will create a stunning visual contrast.
For a more casual presentation, pile the danishes high in a rustic basket. This is perfect for potlucks or picnics. Pair them with a steaming cup of coffee or a refreshing glass of iced tea. Trust me, this homemade cheese Danish recipe absolutely slays at dinner parties!
This homemade cheese Danish recipe is also perfect for gift-giving. Package them in a decorative box tied with a ribbon. Add a handwritten note expressing your appreciation. It’s a thoughtful and delicious way to show someone you care.
Don’t throw away any leftover danishes! They’re delicious reheated in the oven or microwave. You can also crumble them over yogurt or ice cream for a decadent topping. For more bold flavor adventures, check out my Strawberry Danish with Cream Cheese; the taste is divine!
FAQs
Got questions? I’ve got answers! Here are some of the most common challenges flavor adventurers face when making this homemade cheese Danish recipe, along with my top tips for success.
Q: Can I make this homemade cheese Danish recipe ahead of time?
A: Absolutely! You can assemble the danishes and store them in the refrigerator overnight. Just bake them as directed the next morning. The flavors will actually meld together and become even more intense.
Q: What if I don’t have almond extract?
A: While I highly recommend using almond extract for that extra layer of flavor, you can substitute it with an equal amount of vanilla extract. The danishes will still be delicious, but they won’t have that same subtle nutty note.
Q: How do I know when my homemade cheese Danish recipe is perfectly done?
A: The puff pastry should be golden brown and puffed up, and the filling should be set. A toothpick inserted into the filling should come out clean. If the pastry is browning too quickly, you can tent it with foil to prevent burning.
Q: Can I use a different type of cheese for the filling?
A: While cream cheese is the traditional choice, you can experiment with other soft cheeses, such as mascarpone or ricotta. Just be sure to adjust the sweetness accordingly.
Q: Can I add fruit?
A: Absolutely! Fresh berries, such as raspberries, blueberries, or strawberries, would be a delicious addition. Just add them to the center of each square before folding the corners. This homemade cheese Danish recipe reminds me of another flavor explosion, my Chicken Parmesan Grilled Cheese!
Q: What if my puff pastry is cracking?
A: Puff pastry can be tricky to work with, especially if it’s too warm. Make sure your puff pastry is cold but pliable before unfolding it. If it starts to crack, gently press the cracks together with your fingers.
Q: Can I freeze these homemade cheese Danish recipe for later?
A: Yes! Bake as directed, then let them cool completely. Wrap them individually in plastic wrap and store them in a freezer-safe bag or container. When you’re ready to enjoy them, thaw them overnight in the refrigerator and reheat them in the oven or microwave. Or, check out Cream cheese Danish – Sugar Pursuit for another delicious take on cheese danishes!
CONCLUSION
This homemade cheese Danish recipe represents everything Cuba Queen stands for: bold flavors, approachable recipes, and unforgettable moments in the kitchen. It’s a celebration of simple ingredients transformed into something truly special.
My homemade cheese Danish recipe Power Tips:
- Don’t overmix the cream cheese filling. Overmixing can incorporate too much air, causing the filling to puff up too much during baking and then deflate.
- Use cold butter. Cold butter is essential for creating those flaky layers in the puff pastry.
- Bake at a high temperature. A high temperature helps the puff pastry puff up quickly, creating a light and airy texture.
Here are a few homemade cheese Danish recipe variations I’ve created and loved:
- Lemon Zest: Add 1 teaspoon of lemon zest to the cream cheese filling for a bright, citrusy twist.
- Chocolate Chip: Sprinkle a handful of mini chocolate chips over the cream cheese filling before folding the corners.
- Apple Cinnamon: Sauté diced apples with cinnamon and sugar, then add them to the center of each square along with the cream cheese filling. If this recipe rocks your world, you NEED to try my mac and cheese stuffed onion rings!
The lemon zest version always gets the biggest reactions! It’s the perfect balance of sweet, tangy, and refreshing. Another great place to start for inspiration is Cheese Danish (Perfect Treat for Breakfast) – Budget Bytes!
I have complete confidence that you can make this homemade cheese Danish recipe your signature dish. It’s easier than you think, and the results are absolutely worth it. So go ahead, flavor adventurers! Embrace the challenge, unleash your creativity, and create some unforgettable homemade cheese Danish recipe memories. I am sure it will be easy and you will find all the info you need at Easy Cheese Danish with Puff Pastry – Cook Fast, Eat Well.
Don’t forget to share your creations with me! I can’t wait to see your homemade cheese Danish recipe masterpieces. Let’s make the world a more flavorful place, one danish at a time! 🔥🌮✨
homemade cheese danish recipe
Enjoy a flaky and delicious homemade cheese danish with a creamy filling. This recipe is perfect for breakfast, brunch, or a sweet treat any time of day.
- Prep Time: 20 minutes
- Cook Time: 20 minutes
- Total Time: 40 minutes
- Yield: 9 danishes
- Category: Dessert
- Method: Baked
- Cuisine: American
Ingredients
- 1 sheet (14.1 ounces) frozen puff pastry, thawed
- 8 ounces cream cheese, softened
- 1/4 cup granulated sugar
- 1 large egg yolk
- 1 teaspoon vanilla extract
- 1 tablespoon milk
- 1 tablespoon coarse sugar, for topping (optional)
Instructions
- Preheat oven to 400°F (200°C). Line a baking sheet with parchment paper.
- In a medium bowl, beat together the cream cheese and granulated sugar until smooth.
- Stir in the egg yolk and vanilla extract until well combined.
- Unfold the puff pastry sheet on a lightly floured surface. Cut the pastry into 9 equal squares.
- Place a spoonful of the cheese mixture in the center of each square.
- Bring two opposite corners of each square to the center and pinch to seal.
- Brush the tops of the danishes with milk and sprinkle with coarse sugar, if desired.
- Bake for 15-20 minutes, or until golden brown.
- Let cool slightly before serving.
Notes
For a fruity twist, add a dollop of your favorite jam on top of the cheese filling before baking.